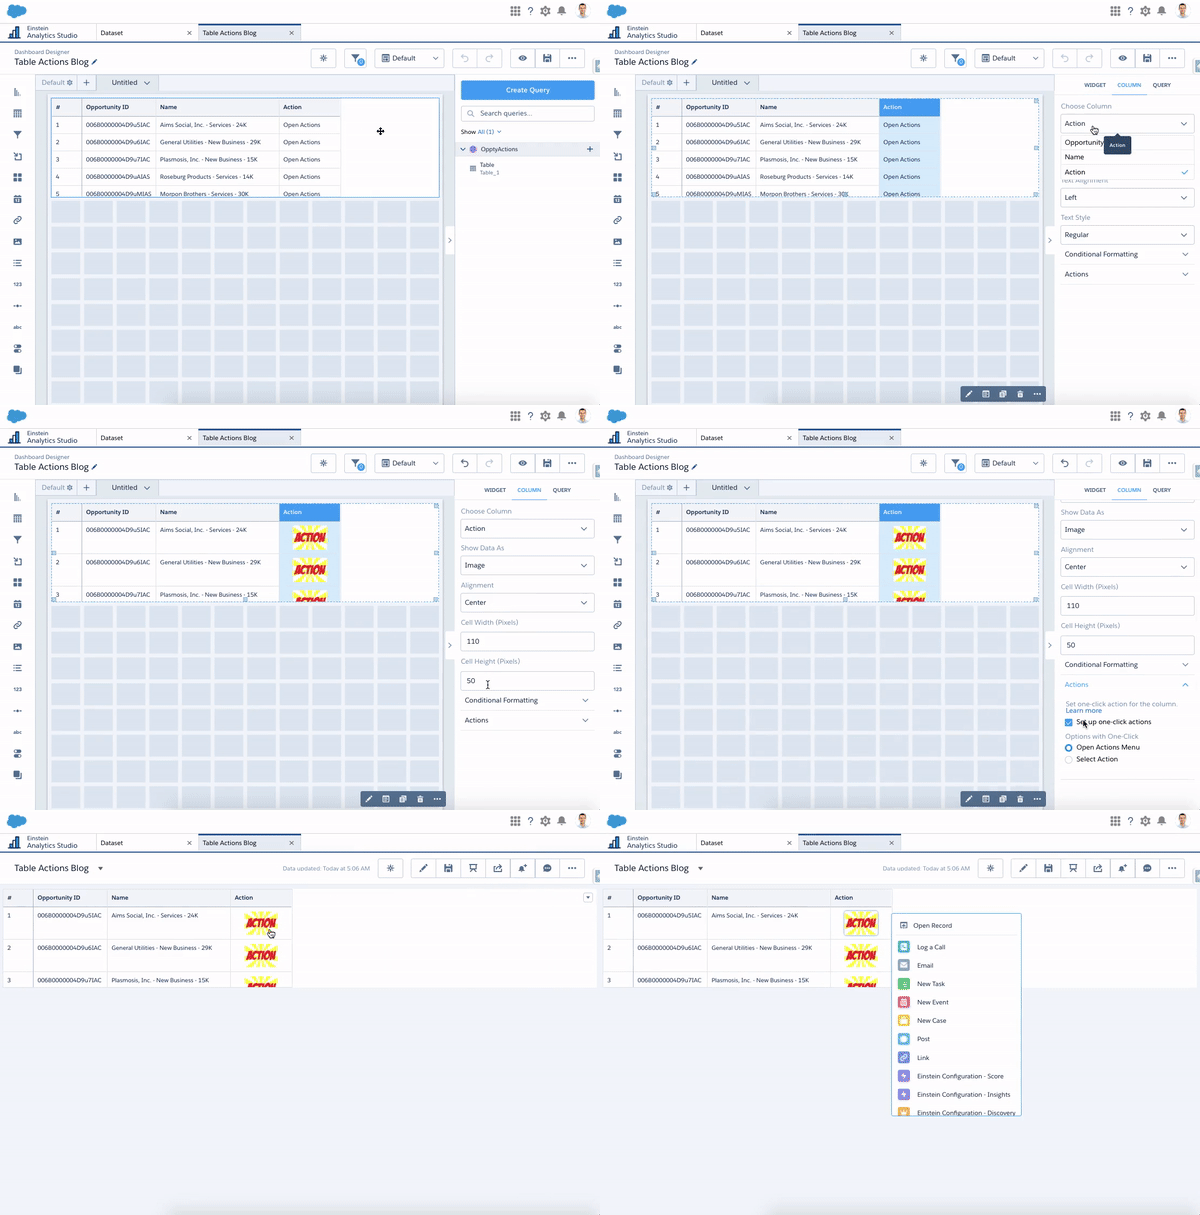
Users love tables on their dashboards, it’s a great way to see details after you have filtered through your data. What is even better you can make any row actionable pulling up the action menu allowing you to open records or perform Salesforce global actions. In Winter ’21 there is an addition to how actions can be shown as a hyperlink instead of a dropdown arrow in the table. In addition, you can now apply custom actions on derived dimensions. Naturally, I went ahead to see if I could make an image or button an action link; I could and I’ll explain how you can get something like the image below in this blog.

Finding an image
The first thing to do is make sure you have an image you can use. The image must be added to the Salesforce org, to be referenced in your table.
Log in to your Salesforce instance and head to ‘files’ and hit the library option in the menu on the left-hand side. You can upload an image by selecting a library and clicking “add files”.

The next thing you want to do after your image has been uploaded it to preview it, right-click on the image and copy the image link address. Make sure to paste the link in a text editor for later as we will need it when we are creating our table.

Creating your table
With the image in Salesforce, let’s create a dashboard with a table. I’ll keep my dashboard super simple and only have my table on there, however, you can add as much as you want on your real use cases. Also for this demonstration, I have created a very basic dataset using the opportunity dataset including the fields ‘Id’ and ‘Name’, but this use case does not demand it’s own dataset, I am just keeping it simple.
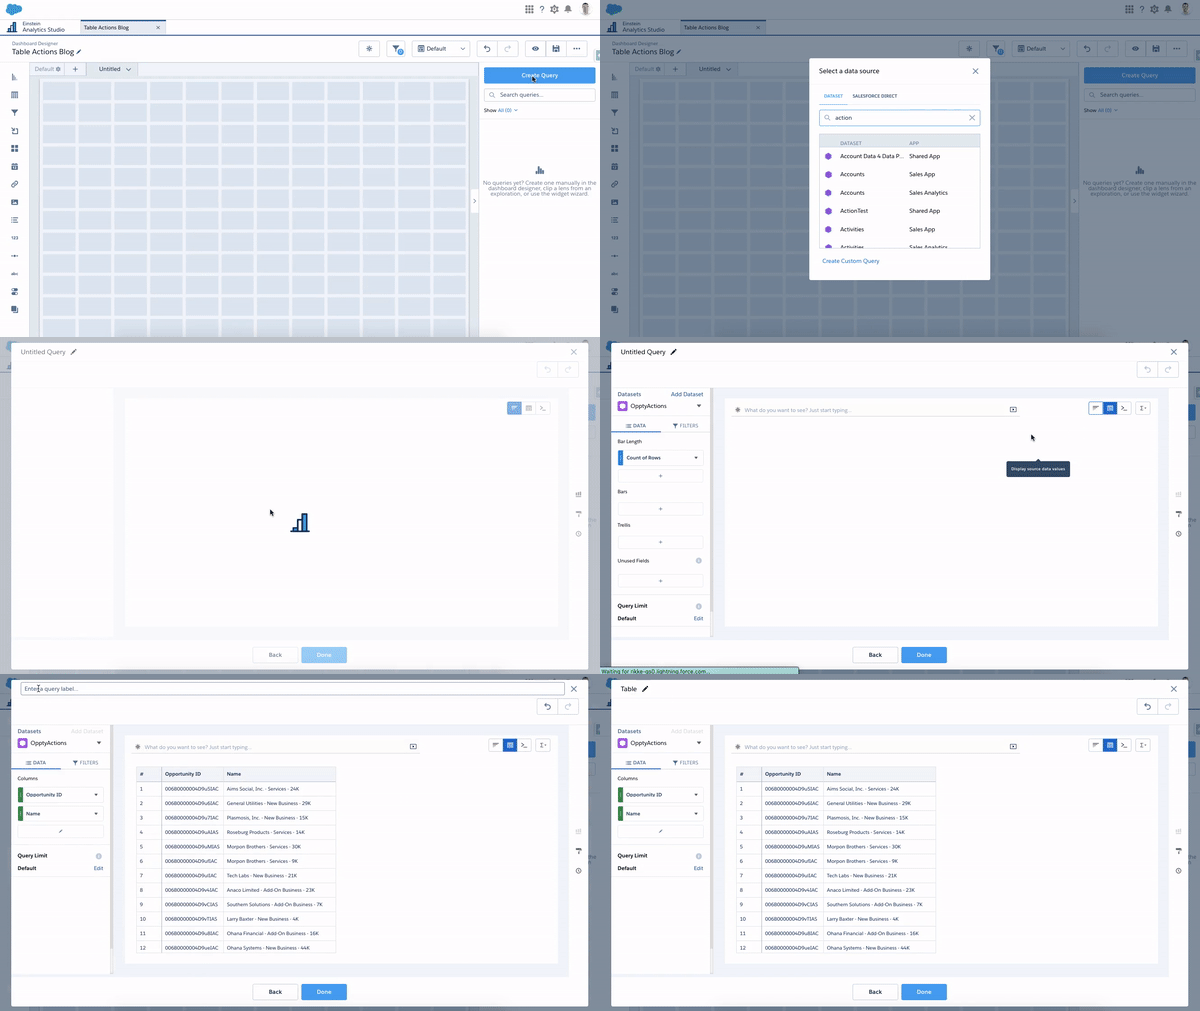
Once you have created a new dashboard, let’s add a new query, choose your dataset and switch to table mode adding the fields you want.

Next, we need to add our derived dimension containing the image link address to the table. In order to do this we need to switch to query mode and add the following to our query:
"<insert image link address>" as 'Action'
In my case this will translate to:
"https://rikke-gs0--c.gus.content.force.com/sfc/servlet.shepherd/version/renditionDownload?rendition=ORIGINAL_Png&versionId=068B00000090oQR&operationContext=CHATTER&contentId=05TB000000EG6UA" as 'Action'
My whole query will now look like this:
q = load "OpptyActions";
q = foreach q generate 'Id' as 'Id', 'Name' as 'Name', "https://rikke-gs0--c.gus.content.force.com/sfc/servlet.shepherd/version/renditionDownload?rendition=ORIGINAL_Png&versionId=068B00000090oQR&operationContext=CHATTER&contentId=05TB000000EG6UA" as 'Action';
q = limit q 100;

Once you have modified the query you can run it and hit done as well as add it to your dashboard. Do remember to save your dashboard.

Enabling custom actions
Now let’s look at the dataset XMD; find your dataset and click on the arrow to the right and choose “Edit”.

On the edit screen you will find the “Explorer” button that will open up a lens. Next to the dataset name you will find an arrow that will allow you to open up the fields panel – click on it. In the “derived dimension” section click the “+ Add Derived Dimension” and call it “Action”, just as you called the derived dimension in the query from before. Make sure to save your changes.

We can now go back to the dataset edit screen, please refresh the screen to make sure the XMD includes the latest changes. Next, we need to enable actions. The UI only supports creating actions on actual fields not derived dimensions, so we will have to do that directly in the JSON. So download the XMD by choosing “Download” in the Extended Metadata File dropdown.

Now open the file in a text editor. If you are unable to you can also open it in the online tool JSON Editor Online. We need to modify the section for the derived dimension we just created.
We need to add the values as shown below. Notice that the recordIdField has a value of “Id”. This is referencing the id from your dataset, that you want to apply the action to. So in this case it refers to the opportunity record.
"linkTemplateEnabled": true,
"recordIdField": "Id",
"salesforceActionsEnabled": true,
In addition, I suggest modifying the member section. Now, this is not necessary for the action to work, however, you will avoid having a very large tooltip on the hover over containing the image URL. Instead, it will be “Open Actions” as defined in the label. The actual member is the image URL we added to the query before.
"members": [
  {
   "label": "Open Actions",
   "member": "https://rikke-gs0--c.gus.content.force.com/sfc/servlet.shepherd/version/renditionDownload?rendition=ORIGINAL_Png&versionId=068B00000090oQR&operationContext=CHATTER&contentId=05TB000000EG6UA"
  }
],
In the end, my derived dimension Action looks like this:
"conditionalFormatting": {},
"customActions": [],
"field": "Action",
"linkTemplateEnabled": true,
"members": [
{
"label": "Open Actions",
"member": "https://rikke-gs0--c.gus.content.force.com/sfc/servlet.shepherd/version/renditionDownload?rendition=ORIGINAL_Png&versionId=068B00000090oQR&operationContext=CHATTER&contentId=05TB000000EG6UA"
}
],
"recordIdField": "Id",
"salesforceActionsEnabled": true,
"recordDisplayFields": [],
"salesforceActions": [],
"showInExplorer": true

Make sure to save your file, then replace the XMD with the new version by returning to the dataset edit screen and choose the replace option where you downloaded the XMD previously.

Alright, time to return to the dashboard in edit mode and select the table. In the panel to the right click the “Column” tab and make sure the “Action” column is selected. Instead of showing data as text change it to “Image”, you will now see the image of the URL.
Finally, at the bottom, you will see the “Actions” section which you need to expand. Make sure to select “Set up one-click actions”. I’ve left the “Open Actions Menu” selection but if you want to specify a single action, you can do that as well. Now you can preview the dashboard and click on the image.

That’s it. Maybe this is an option to make it clear that users can make actions from the tables. Also it makes your tables a little bit cooler to look at.
Totally didn’t know one click actions was a thing, this is sweet!
Pete, more like I always forget we can create derived dims and hardcode values in the projection statement!! :)) Super creative workaround Rikke!! I thought we’d totally have to use linkTemplate and open record menu…had no idea you could bypass it with Member…soooo slick!!!
Great content Rikkie.
I tried the same thing in my org but I can’t see “set one click action” under for the Action column.
Any idea?
Thanks
You need to make sure the derived dimension and the XMD is the same. It will only appear if the XMD has a matching action property.
Thanks Rikkie !
I was able to modify XMD and could see the actions now.
I am trying to link a custom action ( which is Lightning component page) to the Action column but unable to do so.
I could see the one click action of my custom action but when I add it and view it I get error saying “This page has an error. You might just need to refresh it.
[Make sure the “Action” identifier exists and is spelled correctly without spaces.]”
Any help or idea?
Thanks once again.
I got the issue Rikkie. The was some issue in formula field.
Thanks for your help : )
This is cool! Just used it on my Dashboard.
Only thing is im having an issue when I click on the image the action I am getting a error that states “Failed to load the actions for this record. Any idea what is going on ?
Hi Rikki,
This is great stuff, as always!
Would you happen to know of a way to add a one-click action to a chart? For example, if I have a bar chart of top 10 accounts, with a count of opportunities, I might want to click on the account name to launch to the Account record page. I can use XMD to pop up the “Open Record” menu, but the Hyperlink is much slicker. Also, in trying to figure this out, I couldn’t seem to find where the One-click action data is stored in the dashboard JSON or the XMD. Any idea?
Thanks,
Mike
Hi Rikke,
This really helpful! I have a requirement wherein I have 2 dashboards. 1st dashboard has the list of accounts. 2nd dashboard has the detail of Account.
Now on click of any of the account records in 1st dashboard table I want to open 2nd dashboard which will show detail of account that I selected in 1st dashboard. So the requirement is how I can pass the account id from one dashboard to other and then in the final dashboard how I can access the passed account id from other dashboard.
Thanks
Try to use pages. You can’t pass ids between dashboards.
Hello, great article. How can use a quick action to open an record in salesforce without displaying the record id in the CRMAnalytics table?